Amazon, being the biggest E-commerce company in America, has the largest variety of products in the world. Data like product prices, ratings, reviews, styles, promotion information, etc., play a key role in the success of an online business.
However, there might be a misunderstanding about data extraction: people who have no idea about writing code can not scrape data from Amazon but can only use “Ctrl C + V”. Things have changed since web scraping tools appeared.
This article introduces a free Amazon product scraper that can help you collect Amazon product data without any coding to boost your online business. Also, you can learn other methods to help you scrape product data from Amazon quickly.
Quick Answer
In 2025, a common workflow to scrape Amazon product data includes:
1) Using a reliable scraping tool to avoid IP blocking and CAPTCHAs;
2) Targeting key product data points such as price, reviews, and ASIN; and
3) Exporting the data into structured formats like CSV or JSON for analysis.
What Types of Product Data Can Be Scraped
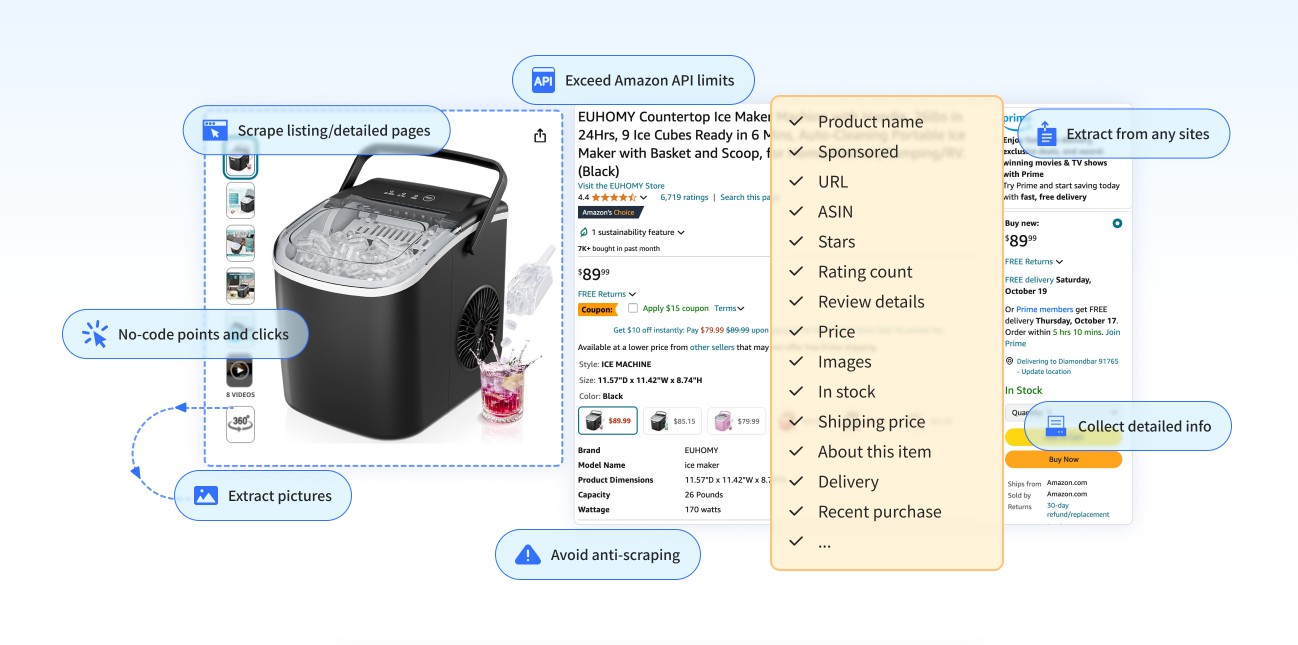
Almost everything about products is available for scraping on Amazon. On product listing pages, you can scrape product information, including:
Take WATCH as an example, you can collect the product name, sponsored state, ASIN, rating, current price, etc. All these public data can be scraped into structured files. After that, with some other visual analysis tools, you can quickly analyze the product and optimize your listings to attract more customers.
Why Scraping Amazon Product Data
So, here comes the question of why it is important to scrape product information from Amazon into structured data. Before starting with the how-to steps, you can learn about the benefits of scraping Amazon product data and the difficulties you may encounter.
1. Monitor your competitors to keep competitive
Always keeping an eye on your competitors on Amazon will help you stay one step ahead in the market.
Scraping and analyzing data on competitor products like pricing, description, reviews, and ratings can contribute to real-time market intelligence, so that you can identify what’s working for them and your target consumers, then adapt your own product listing accordingly.
2. Catch the market trends
The market is ever-changing nowadays. By collecting and analyzing data from thousands of Amazon products over time, you can get valuable insight into emerging trends, popular brands, engaging keywords, changes in consumer demand, etc., and use this info to determine if you need to launch products or improve services to meet shifting market needs.
3. Optimize your Amazon marketing strategy
Improving search position is important not only on Google, but also on Amazon. To improve Amazon search positions and marketing strategies, you still need the help of Amazon product data. Product titles and descriptions from your competitors’ listings can reveal what keywords and strategies are most effective. Pricing strategies, promotion techniques, key phrases, images, etc., can all drive sales. You can analyze such data to compare your KPIs, and adjust accordingly to improve click-through and conversion rates.
4. Improve your products and services
Consumers’ feedback is a mirror that reflects how they think about the products they buy and the services they enjoy. By paying attention to their reviews and feedback on similar Amazon products, you can learn what they want most and improve your offerings accordingly. Also, Amazon data scraping reveals specific feature requests, complaints, and competing product strengths that you can incorporate to enhance your value proposition.
Difficulties and Solutions in Scraping Amazon
While using product scrapers to pull data from Amazon, you might meet some challenges, because they have implemented anti-scraping measures to managing scraping attempts at different scales. However, these measures are very common on a lot of platforms.
To maximize your chances of successfully harvesting all the data you need on an ongoing basis, you need to understand these measures and the anti-scraping approaches you can use to overcome them.
| Difficulties | Solutions |
| IP blocking | IP proxy service provides rotated and residential IPs |
| CAPTCHA | Implemented CAPTCHA-solving solution |
| Page-structure change | Scraping from Amazon API |
Besides the difficulties above, you might face more complicated situations while scraping Amazon data due to frequent changes in their site structure and stricter anti-scraping measures.
Below are some other approaches you can consider:
- Rotating user agents (this helps you mimic requests from different browsers and devices; thus it is harder for Amazon to detect and block your scraper.)
- Using a cloud platform with cloud servers and storage
- Setting up a data monitoring system to alert you of significant changes in data volume
- Hiring someone to maintain the scraper once anything goes wrong
Don’t be intimidated by the complicated solutions listed there. If you scrape a top 100 product under one category just a few times, you might not need it. You might happily get the data without any problems, and you have a range of tools to choose from.
But if you need high-frequency data with a huge amount of data volume or your desired data points are rarely popular, you might need to consider more comprehensive features.
If you want to learn more about Amazon web scraping legacy and difficulties, you can keep reading this article: Is It Legal to Scrape Amazon Data.
3 Methods to Scrape Amazon Product Data
Next, you can learn three different ways to extract product data from Amazon, no matter coding or no-coding. Choose the one that is most suitable for you.
Method 1: online Amazon product data templates
The easiest method to extract product information from Amazon is using a preset template. Octoparse provides such data scraping templates for Amazon and other popular sites, with which you can get Amazon product data without any coding but just entering a few parameters. What’s more, these data templates can work from your browser, so you don’t need to download any software. Try this Amazon product scraper below to scrape data like title, brand, star rating, reviews, price, stock, color, etc.
https://www.octoparse.com/template/amazon-product-details-scraper
Method 2: build Amazon product data crawler without coding
The data templates have already set the scraping paths already, so you cannot make any changes. Choose Octoparse and create a crawler by yourself to meet all your scraping needs. It’s easy-to-use, and with the AI-based auto-detecting function and point-and-click interface, you can finish the scraping without any coding skills. Octoparse also offers advanced functions like IP proxy, CAPTCHA solving, cloud service, etc. to help you get more data. Download Octoparse and follow the easy steps below to customize your Amazon product crawler.

Turn Amazon product data into Excel, CSV, Google Sheets, and your database directly.
Scrape data easily with auto-detecting functions, no coding skills are required.
Product images can also be downloaded in batches.
Never get blocked with IP proxies and advanced API.
Cloud service to schedule data scraping at any time you want.
Steps to Scrape Amazon Product List Using Octoparse
Steps 1: Paste Amazon product page URL to Octoparse and start auto-scraping
Download, install, and sign up for an account for free in Octoparse. Then copy the Amazon product page URL you need to scrape and paste it to the main interface of Octoparse, the auto-detect mode will start.
Steps 2: Customize the data fields
Create a workflow after the quick auto-detect. You can make more customized options like Pagination, Loop, and modify the data fields. Just finish all operations by clicking and dragging-and-dropping.
Steps 3: Download Amazon product data into Excel
Once you have selected all wanted data fields and ensured the workflow works well, click on the “Run” button and select a running mode for your task. Finally, you can export the scraped data as local files like Excel, CSV, HTML, etc., or to databases like Google Sheets.
You can check out more details from the How to Scrape product information from Amazon tutorial if you still have any questions.
Method 3: Scrape Amazon Data by Programming
If you are a programmer and want to communicate with Amazon.com with a script, there are multiple APIs you could utilize to get Amazon data. What you need is just to code to connect to the API and easily download the data.
Amazon Product Advertising API is one of them. It is a web service and application programming interface that gives application programmers access to Amazon’s product catalog data. It is officially provided by Amazon and free to use. This API opens the doors to Amazon’s databases for users to retrieve detailed product information, reviews, and images so that they can take advantage of Amazon’s sophisticated e-commerce data and functionality.
But like most APIs, the API doesn’t provide all the information on the product page. To get those data or to realize other scraping needs such as price monitoring, you can program your own customized Amazon web scraper using Python or other languages.
Building a web scraper needs professional coding knowledge and is also time-consuming. For non-coders or programmers who want to save time, web scraping extensions and software are better choices.
Final Words
Amazon is a gold mine of data. Scraping product data from Amazon can help you understand the market, trends, and your competitors. It can be the key to your business success.
Using web scraping tools like Octoparse, anyone can create Amazon product scrapers and use the data without having any coding knowledge. You should give Octoparse a try if you own or plan to own an online business. Start here and get the right data for business growth.
Anyway, hope you find this article helpful! Happy Scraping!
Frequently Asked Questions
1. How often does Amazon update its product information?
Product metrics like Best Seller Rankings (BSR) can update every 15 minutes, so frequent and timely scraping is necessary to maintain accurate, real-time data for market intelligence.
2. How can I validate scraped Amazon price and review data for accuracy?
Here are a few things you can do to make sure your data isn’t leading you astray.
First off, try pulling the same product data a few times, maybe at different times of the day or on different days. If the numbers jump around a lot, it could be because prices and reviews change, or maybe your scraper hit a snag.
Next, take a quick peek yourself. Pick a handful of products and visit their pages manually. Does the price in your spreadsheet match what’s on the site? How about the star ratings and review counts?
Since Amazon’s site changes often, your scraper might miss some info or grab outdated data if the page layout shifts. So, keep an eye on the structure of those pages and tweak your scraper when things look off.
Lastly, lots of people use smart tools and services that come with built-in ways to dodge blocks and CAPTCHAs, so your scraper doesn’t get cut off halfway through. That helps keep your data clean and reliable.
3. Is it legal to scrape product data from Amazon?
The legality of scraping Amazon data depends on what data you scrape, how you scrape it, and how you use it.
Generally, scraping publicly available product information like titles, prices, and reviews is considered low risk, but scraping private account data can raise legal and privacy concerns.
It’s important to review Amazon’s Terms of Use and local laws before proceeding.